Home About Treasure Troves Newsletter Books Workshops Column Karen Cole Site Map Links

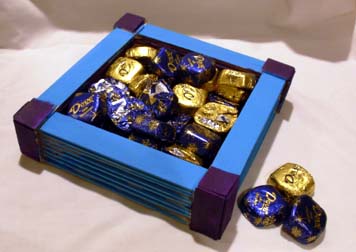
Another Big Learning Craft Stick Project...

Candy Box

This is a box built up by stacking layers of craft sticks. Ask your kids what else they could make with this technique. A house with rooms? Could they make other shapes? How about a hexagon box? What about a triangle? The possiblities are endless.

Big Learning  What's Big Learning?

Math: measuring fractional units, properties of squares and other regular geometric shapes (when extending the project to design non-square boxes), multiplication (when figuring out how many sticks a given box will require).

Art: Using artistic touches to express an object's function. We've painted the sample purposely plain - but your child doesn't have to! What makes this a candy box? Your child might want to paint the word "Candy" or pictures of candy, or glue candy wrappers to the sides. Simply adding whimsical touches - like dots or squiggles - can express that this box holds something fun.

Wood craft:
learning to make panels by combining strips of wood; using trim to hide less attractive parts of a design, making square corners.


craft stick candy box filled with chocolates - children's woodworking project


To make this box you need

About 50 large craft sticks (3/4 inches wide by 6 inches long)
Acrylic craft paint

Hot glue gun and glue
Sandpaper
Wire cutter with at least a 3/4-inch blade (for cutting craft sticks see cutting tips)
Ruler or tape measure, t-square

Notes:

  • Sanding: Whenever you cut a craft stick, smooth the ends by rubbing on piece of sandpaper. This will greatly improve the look of the finished product.
  • Painting: If you want a uniform finish, paint all the craft sticks before you start building your box.
  • How many sticks? Your kids can figure out how many sticks to use for a box of any height, using the facts that 4 layers = about a half inch, and each layer = 4 sticks, one on each side of the box. So for a 2" box, your child would need about 16 layers, or 16x4=64 sticks. The instructions here are for a nine-layer box, which means 36 sticks for the sides. Then you need 10 more sticks for the bottom and a couple for the trim.

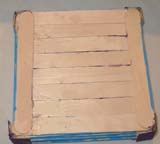
Box sides

Lay out the first layer as shown and glue - see tips.

four craft sticks in square shape

Continue gluing and stacking until you have nine layers.

Box Bottom

Lay craft sticks across the bottom of the box and glue in place.

craft sticks that form the bottom of the box

Add two craft sticks along the vertical edges to brace and level.

Trim

Cut 8 pieces 1-1/2 inches long, or equal to the height of your box (measure to be sure). Cut four square pieces 3/4 inches long.

Glue the 1-1/2 inche pieces on the four corners and top with the 3/4 inch pieces, as shown in the photo at the top of this page.

Back to the Big Learning Craft Sticks Page


©2006 Karen Cole Privacy Policy HomeAboutTreasure Troves Newsletter WorkshopsBooks Column Site Map Karen ColeLinks