| Home | About | Treasure Troves | Newsletter | Books | Workshops | Column | Karen Cole | Site Map | Links |
| |
||||||||||
|
|
Another Big Learning Craft Stick Project... Car or Train Tunnel |
||
|
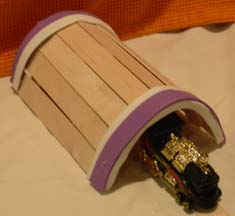
Your child can add tunnels to their train setup for a fraction of the cost of store-bought tunnels. Craft foam trim adds a colorful rainbow effect. Big Learning What's Big Learning? Architecture and engineering: This project uses arches, which are both attractive design elements and important for holding heavy loads.If this tunnel were underground, the arch would be holding up the earth or water above it. Once your kids start thinking about arches they'll see them everywhere - see how many they can find around town, and ask them to think about the loads they're supporting, if any. Math (Geometry): Note that an arch is just a section of a circle - in this case, a circle around the can you use to shape the wood. In fact, rainbows, which children think of as arch-shaped, are actually circular when viewed from an airplane. We only see a portion of the circle from the earth. |
||
|
|
||
|
To make this tunnel you need: About 9 large craft sticks (3/4 inches wide by 6 inches long) Hot glue gun and glue Notes
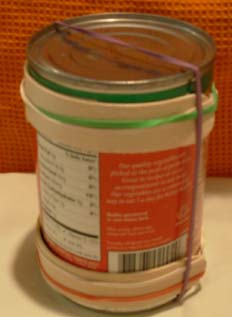
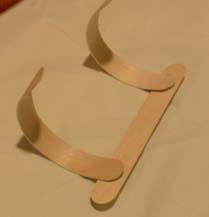
Arched ribs Soak two craft sticks in hot tap water for about 30 minutes. Slowly and gently, bend the craft stick around the 14-oz can and secure with rubber bands, as shown.
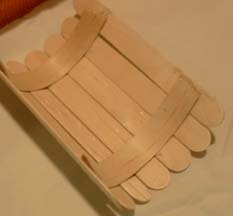
Tunnel body Starting at one end of the ribs, place a craft stick slightly below the two ribs to form a straight, uniform bottom edge for the tunnel. Make sure the ribs are as straight as possible so that the tunnel will end up straight. You may find it easier to leave the ribs on the can until you have glued this first slat.
Continue gluing slats until you have worked your way almost to the other side. If necessary, cut the other end of the ribs so that the last slat extends just past the end of the ribs and sits level on the table.
If you want to paint the body, do so now before adding the trim. Allow the paint to dry. Trim Hold the tunnel on its end and trace around the opening with craft foam. Cut out the arch shape and glue it to the end of the tunnel. Cut a strip of craft foam long enough to arch over the top of the tunnel. Glue it as shown in the photo at the top of these instructions (the purple strip). We found it easier to glue the trim a few inches at a time, because the hot glue dries so fast. Add more layers of different colors of trim if you wish to emphasize the rainbow effect at the end of the tunnel. Back to the Big Learning Craft Sticks Page |
||
| ©2006 Karen Cole Privacy Policy |